Thursday, July 1, 2021

¿Cómo Funcionan los Activadores de Software KMS?


¿Cómo funcionan los Activadores KMS?

by Marco Ayllon

Nautilus Science and Technology


A menudo la alternativa más utilizada para piratear productos de Microsoft (Windows y Office) es utilizar los activadores KMS, de estos existen diversos archivos.exe entre los cuales destacan:

  • KMSpico
  • KMS Tools
  • KMSAuto Net
  • Microsoft Toolkit

Sin embargo, estos finalmente son archivos ejecutables de los cuáles no conocemos con exactitud las acciones que realizan. Ahora, si existen estos activadores, también debemos poder realizar la activación de forma “casi manual”. Es decir, analizar el código fuente de estos activadores.

Tras una búsqueda en internet llegamos a los scripts proporcionados por msguides y gwdg, los cuales nos permiten realizar la activación de los productos de Microsoft de una manera “Casi manual”. A continuación analizaremos cómo funciona y por qué funciona los scripts.

ADVERTENCIA:

¿Hoy aprenderás algo nuevo?

¿Qué es el servicio KMS?

El Servicio de Administración de Claves KMS (Key Management Service) es un servicio legitimo de Windows y está diseñado para que las organizaciones activen sus productos por volumen.

Es decir, la organización contrata un paquete de licencias que serán utilizadas por toda su empresa donde, a diferencia del licenciamiento estándar de Microsoft, estas no se anclan a una máquina en especifico sino a la cuenta de una empresa.

Por lo anterior, para este tipo de activación se debe contemplar lo siguiente:

  1. La empresa debe montar su propio servidor KMS.
  2. Requieren un mínimo de activaciones para funcionar. Es decir, para hacer válidas las activaciones varia el número MÍNIMO de clientes que utilicen la licencia. De otro modo las licencias no serán validadas.
    Por ejemplo, si el paquete de office requiere un mínimo de 10 usuarios para realizar la activación por lote, tu servidor KMS debe tener registradas al menos a 10 máquinas para que todas cuenten con la licencia por lote de Office, si en algún momento bajan a solamente 9 activaciones todas las máquinas dejarán de tener una licencia válida de Office.
  3. La activación por lote solamente se activa de manera temporal, durante 180 días, y su licencia debe ser renovada antes de que termine ese plazo. Sin embargo, este proceso lo hace automáticamente el software por lo que mientras el servidor KMS se mantenga online y activo no habrá problema.

¿Cómo funcionan los activadores KMS?

Gracias a la existencia del servicio KMS (Key Management Service) es posible que cualquier persona pueda montar su propio servidor KMS modificado para que este apruebe las licencias de los usuarios.

Para esto solamente se requiere lo siguiente:

  1. Montar tu propio servidor KMS
  2. Hacer que este tenga una licencia “válida”
  3. Hacer que tus computadoras consulten a TU SERVIDOR KMS

Para esto ya existe un script proporcionado por https://msguides.com/ el cual se conecta a su propio Servidor KMS. Es decir, msguides ya hizo todo el trabajo.

¿Cómo se valida la licencia de Windows mediante un script KMS?

Para validar una licencia de Windows mediante el servidor KMS que proporciona msguides tenemos que realizar lo siguiente:

  1. Ubicar que versión de Windows tenemos instalada
  2. Cambiar nuestra clave de producto por una valida para el servidor KMS
  3. Cambiar nuestro servidor de activación por uno proporcionado por msguides
  4. Activar el producto

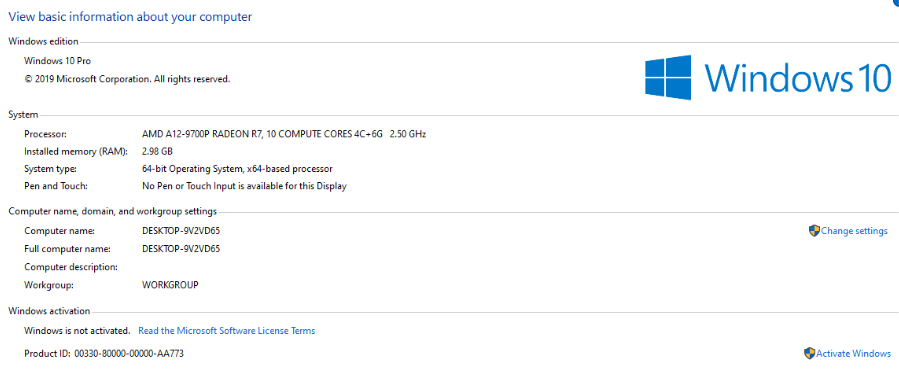
1) Verifica tu versión de Windows instalada

Desde nuestro explorador de archivos, daremos click derecho sobre “This PC” y seleccionaremos “Properties”. Encontraremos entonces una ventana como la siguiente:

Información del sistema. Nos interesa que es Windows 10 Pro.

2) Cambiar nuestra clave de producto por una válida para el servidor KMS

Una vez que conocemos la versión de Windows que tenemos procedemos a ubicar el número de clave que tenemos que utilizar.

Win 10 Home: TX9XD-98N7V-6WMQ6-BX7FG-H8Q99 
Win 10 Home N: 3KHY7-WNT83-DGQKR-F7HPR-844BM
Win 10 Home Single Language: 7HNRX-D7KGG-3K4RQ-4WPJ4-YTDFH
Win 10 Home Country Specific: PVMJN-6DFY6-9CCP6-7BKTT-D3WVR
Win 10 Professional: W269N-WFGWX-YVC9B-4J6C9-T83GX
Win 10 Professional N: MH37W-N47XK-V7XM9-C7227-GCQG9
Win 10 Education: NW6C2-QMPVW-D7KKK-3GKT6-VCFB2
Win 10 Education N: 2WH4N-8QGBV-H22JP-CT43Q-MDWWJ
Win 10 Enterprise: NPPR9-FWDCX-D2C8J-H872K-2YT43
Win 10 Enterprise N: DPH2V-TTNVB-4X9Q3-TJR4H-KHJW4

Para nuestro caso utilizaremos la versión de Windows 10 Professional. Por lo que desde una pestaña cmd con derechos de Administrador teclearemos lo siguiente:

slmgr /ipk W269N-WFGWX-YVC9B-4J6C9-T83GX 
  • /ipk establece una clave de producto
Output del paso 2

3) Cambiar nuestro servidor de activación por uno proporcionado por msguides

slmgr /skms kms8.msguides.com
  • /skms establece el nombre del servidor kms
  • Si por alguna razón da un error kms8.msguides.comse puede probar con: kms7.msguides.com ó kms9.msguides.com
Output del paso 3

4) Activar el producto

slmgr /ato
  • /ato realiza la activación
Output del paso 4

Si volvemos a las propiedades del sistema del paso número 1 podremos ver que ahora nuestro windows ya está activado

Propiedades del Sistema Operativo

*** En caso de que la activación no funcione se deberá utilizar el siguientes comando y reintentar nuevamente el proceso desde el paso 1

slmgr -upk
  • -upk Desinstala la clave actual de Windows.

¿Cómo se valida la licencia de Office mediante un script KMS?

Para utilizar este script es necesario descomprimir el archivo activate_office.zip desde el repositorio de Github. Este archivo está protegido por contraseña porque de otro modo Windows Defender lo detecta como amenaza al descargarlo.

  • Asegúrese de que Windows Defender esté desactivado.

Password:
activate

Una vez descomprimido el archivo solamente tenemos que dirigirnos a la carpeta activate_office y *ejecutar como administrador* el archivo activate.cmd

  1. Click derecho, ejecutar como administrador
  2. Nos abrirá una consola
  3. Presionaremos enter una vez. Esto tardará un poco, en caso de ser necesario presionaremos enter de nuevo.
  4. Debe aparecernos: <Product activation successful> (De no ser así es probable que no haya corrido el script con privilegios de administrador)
  5. Luego de ello nos preguntará si queremos visitar el blog del autor de este script
  6. Y así habremos comprobado que efectivamente el office ha quedado activado

Dato curioso:
Tu office se transforma a Office 2016 Pro Plus debido a que no tiene licenciamientos disponibles para las otras versiones.

¿Es seguro utilizar activadores KMS?

Como vimos anteriormente el problema no es usar activadores KMS, pues estos son proporcionados por Microsoft a las empresas que pagan licenciamiento por volumen. El verdadero problema es llegar a la piratería de estos servicios, pues es ahí donde nos podemos encontrar con software malicioso.

Sin embargo, el script activador que proporciona msguides parece bastante transparente. El código con comentarios del activador KMS se encuentra en la sección Anexo Script con comentarios.

Anexo Script KMS con comentarios

:: ========================================================                                     :: ========================================================:: ========================================================:: Aquí separamos el script de una manera únicamente ilustrativa, si se trata de correr nos dará un error porque se pierde el formato.:: No necesariamente se ha interpretado correctamente el script, pero se ha hecho el mejor esfuerzo:: ========================================================:: ========================================================:: ========================================================:: @echo off  => define que la terminal no nos devuelva las salidas propias de la terminal:: Es muy usado en los scripts para evitar la salida de información basura@echo off:: title => Crea un título para la ventanatitle _ Permanently Activate Office 365 ProPlus for FREE => MSGuides . com:: & => Es utilizado para concatenar comandos. Usado cuando escribes en una solo línea.:: cls => Hace un limpiado de la pantalla para que no muestre lo escritor anteriormentecls:: Pone los mensajes que nosotros vemos:: echo. hace un salto de líneaecho ============================================================================echo #Project: Activating Microsoft software products for FREE without softwareecho ============================================================================echo.echo #Supported products: Office 365 ProPlus (x86-x64)echo.echo.:: & => Es utilizado para concatenar comandos. Usado cuando escribes en una solo línea.:: ( ) => Es usado para agrupar una secuencia de comandos&(:: Condicion if que checa la existencia de un archivo .vbs (Visual Basic Script):: En caso de que exista entramos a la carpeta:: Esto se hace para Office 2016 versión de x64 bitsif exist "%ProgramFiles%\Microsoft Office\Office16\ospp.vbs"cd /d "%ProgramFiles%\Microsoft Office\Office16")&(:: Condicion if que checa la existencia de un archivo .vbs (Visual Basic Script):: En caso de que exista entramos a la carpeta:: Esto se hace para Office 2016 versión de x32 bitsif exist "%ProgramFiles(x86)%\Microsoft Office\Office16\ospp.vbs"cd /d "%ProgramFiles(x86)%\Microsoft Office\Office16")&(:: Para cada uno de los archivos que cumplan con una expresión regular ejecuta un script:: /inslic Instala una licencia con la ruta proporcionada de la licencia .xrm-ms. Se requiere un parámetro de valor:: Esto lo realiza para preparar las llaves KMS:: Corroborar el output del Anexo Afor /f %%x in ('dir /b ..\root\Licenses16\proplusvl_kms*.xrm-ms')do cscript ospp.vbs /inslic:"..\root\Licenses16\%%x" >nul)&(:: Para cada uno de los archivos que cumplan con una expresión regular ejecuta un script:: /inslic Instala una licencia con la ruta proporcionada de la licencia .xrm-ms Se requiere un parámetro de valor:: Esto lo realiza para preparar las llaves MAK:: Corroborar el output del Anexo Afor /f %%x in ('dir /b ..\root\Licenses16\proplusvl_mak*.xrm-ms')do cscript ospp.vbs /inslic:"..\root\Licenses16\%%x" >nul):: Mensajes que nosotros vemos echo. es un salto de lineaecho.echo ============================================================================echo Activating your Office...:: Esta secuenta de comandos quita la licencia de prueba actual de office. Dependiendo de nuestra versión acertará en alguna&cscript //nologo ospp.vbs /unpkey:WFG99 >nul&cscript //nologo ospp.vbs /unpkey:DRTFM >nul&cscript //nologo ospp.vbs /unpkey:BTDRB >nul:: Registra la nueva licencia de office y procede a realizar una activación por medio de KMS.:: Probará al menos esos tres servidores kms7, kms8, kms9&cscript //nologo ospp.vbs /inpkey:XQNVK-8JYDB-WJ9W3-YJ8YR-WFG99 >nul&set i=1:serverif %i%==1 set KMS_Sev=kms7.MSGuides.comif %i%==2 set KMS_Sev=kms8.MSGuides.comif %i%==3 set KMS_Sev=kms9.MSGuides.comif %i%==4 goto notsupportedcscript //nologo ospp.vbs /sethst:%KMS_Sev% >nul:: Mensajes que nosotros vemos echo. es un salto de lineaecho ============================================================================echo.echo.:: Realiza la activacióncscript //nologo ospp.vbs /act | find /i "successful":: Mensajes que nosotros vemos echo. es un salto de linea& (echo.echo ============================================================================echo.echo #My official blog: MSGuides.comecho.echo #How it works: bit.ly/kms-serverecho.echo #Please feel free to contact me at msguides.com@gmail.com if you have any questions or concerns.echo.echo #Please consider supporting this project: donate.msguides.comecho #Your support is helping me keep my servers running everyday!echo.echo ============================================================================:: Realiza una pregunta para saber si quieres mirar su blogchoice /n /c YN /m "Would you like to visit my blog [Y,N]?"& if errorlevel 2 exit) || (echo The connection to my KMS server failed! Trying to connect to another one...:: Mensajes que nosotros vemos echo. es un salto de linea& echo Please wait...& echo.& echo.& set /a i+=1& goto server)explorer "http://MSGuides.com"&goto halt:notsupported:: Mensajes que nosotros vemos echo. es un salto de lineaecho.echo ============================================================================echo Sorry! Your version is not supported.echo Please try installing the latest version here: bit.ly/odt2k16:haltpause >nul:: Anexo A:: Se puede visualizar la quitar todos los ">nul" del script:: ---Processing--------------------------:: ---------------------------------------:: Installing Office license: ..\root\licenses16\proplusvl_kms_client-ppd.xrm-ms:: Office license installed successfully.:: ---------------------------------------:: ---Exiting-----------------------------:: Microsoft (R) Windows Script Host Version 5.812:: Copyright (C) Microsoft Corporation. All rights reserved.:::: ---Processing--------------------------:: ---------------------------------------:: Installing Office license: ..\root\licenses16\proplusvl_kms_client-ul-oob.xrm-ms:: Office license installed successfully.:: ---------------------------------------:: ---Exiting-----------------------------:: Microsoft (R) Windows Script Host Version 5.812:: Copyright (C) Microsoft Corporation. All rights reserved.:::: ---Processing--------------------------:: ---------------------------------------:: Installing Office license: ..\root\licenses16\proplusvl_kms_client-ul.xrm-ms:: Office license installed successfully.:: ---------------------------------------:: ---Exiting-----------------------------:: Microsoft (R) Windows Script Host Version 5.812:: Copyright (C) Microsoft Corporation. All rights reserved.:::: ---Processing--------------------------:: ---------------------------------------:: Installing Office license: ..\root\licenses16\proplusvl_mak-pl.xrm-ms:: Office license installed successfully.:: ---------------------------------------:: ---Exiting-----------------------------:: Microsoft (R) Windows Script Host Version 5.812:: Copyright (C) Microsoft Corporation. All rights reserved.:::: ---Processing--------------------------:: ---------------------------------------:: Installing Office license: ..\root\licenses16\proplusvl_mak-ppd.xrm-ms:: Office license installed successfully.:: ---------------------------------------:: ---Exiting-----------------------------:: Microsoft (R) Windows Script Host Version 5.812:: Copyright (C) Microsoft Corporation. All rights reserved.:: ---Processing--------------------------:: ---------------------------------------:: Installing Office license: ..\root\licenses16\proplusvl_mak-ul-oob.xrm-ms:: Office license installed successfully.:: ---------------------------------------:: ---Exiting-----------------------------:: Microsoft (R) Windows Script Host Version 5.812:: Copyright (C) Microsoft Corporation. All rights reserved.:::: ---Processing--------------------------:: ---------------------------------------:: Installing Office license: ..\root\licenses16\proplusvl_mak-ul-phn.xrm-ms:: Office license installed successfully.---------------------------------------:: ---Exiting-----------------------------:::: ============================================================================
  • Recomendamos mejor visualizar el código desde el repositorio de Github para ver los colores referentes al código.
  • :: Son comentarios

Problemas / Soluciones

Windows detecta activate como virus:
Lo que sucede es que windows detecta el script como un activador de Office y por supuesto lo bloquea. De hecho, en la descripción de Windows Defender menciona. “HackTool:BAT/AutoKMS This program has potentially unwanted behavior”

  • Basta con deshabilitar Windows Defender durante la activación.

Pantalla azul de bloqueo:
Al igual que Windows Defender — Real Time Protection es necesario desactivar App & Browser Control — Check apps and files

¡No sé la contraseña del zip!
Bro, ese no es un problema. La contraseña es activate como se mencionó en el post.

Sunday, June 14, 2020

Don't Let Windows 10 Spy on You!

Don't Let Windows 10 Spy on You!


by Marco Ayllon
Nautilus Science and Technology News

Let's be honest: Windows 10 is AWESOME, but it has raised several privacy concerns because it has several online features that are flat out malware, such as Windows Defender and Telemetry, both of which send your data (sensitive and not) to Microsoft and can't be disabled. Windows Update also can't be disabled... which means Microsoft can not:
- Run the software on your computer without your consent
- Get data from your computer without your consent
- Remove software and files from your computer without your consent
This qualifies Windows 10 as malware, and more specifically, a botnet.
Fortunately, all these "features" are little more than Windows Services (aka Daemons if you're a *nix user) and can be removed with relative ease.
Let's see how!

Windows 10 Debotnet Guide:

Let's be honest: Windows 10 is AWESOME, but it has raised several privacy concerns because it has several online features that are flat out malware, such as Windows Defender and Telemetry, both of which send your data (sensitive and not) to Microsoft and can't be disabled. Windows Update also can't be disabled... which means Microsoft can not:
  • Run software on your computer without your consent
  • Get data from your computer without your consent
  • Remove software and files from your computer without your consent
This qualifies Windows 10 as malware, and more specifically, a botnet.
Fortunately, all these "features" are little more than Windows Services (aka Daemons if you're a *nix user), and can be removed with relative ease.
Let's see how!

DO NOT USE "EXPRESS SETTINGS"

At the end of the setup process, it will ask you to use Express settings or customize them. Choose customize.
Turn off everything and click next.
Again, turn off everything and click next.

USE A LOCAL ACCOUNT (RECOMMENDED)

Unless you need Windows Store apps, don't use a Microsoft account, click "Skip this step" and use a local one; this way, you won't have to provide your identity to Microsoft.

LET IT DOWNLOAD THE UPDATES

If you follow this guide while the system is updating, you will probably face issues. Let it download them, and when it's done, reboot.

DISABLING WINDOWS UPDATE P2P

Yes, Microsoft actually did this. When you download updates, you'll become a P2P node and they'll steal your bandwidth to save theirs.
Go to Start > Settings > Update & Security > Windows Update > Advanced options > Choose how updates are delivered, and uncheck the option.

DISABLING WINDOWS DEFENDER

All Windows Defender does is remove cracks without asking or even quarantining: if it thinks a file is "suspicious", it will delete it sends it to Microsoft for "examination".
Disabling it is a bit of a hassle, but possible.
First of all, go to Start > Settings > Update & Security > Windows Defender
Turn off everything. You now have exactly 5 minutes to complete this part of the guide before it will turn on again. It's like defusing a bomb!
Press Windows+R, type gpedit.msc, and press enter.
Navigate to Computer Configuration > Administrative Templates > Windows Components > Windows Defender and find the option that says "Turn off Windows Defender"
Double click it, choose Enabled and press OK.
Close everything and reboot, and Windows Defender will be turned off... but still present in your system.

REMOVING WINDOWS DEFENDER

Press Windows+R, type Regedit and press enter.
Navigate to HKEY_LOCAL_MACHINE\System\CurrentControlSet\Services\WinDefend
If you try to simply delete it, you'll discover that they deliberately messed up the permissions so that you can't do that, we have to fix them first.
Right-click the WinDefend key, select Permissions and click Advanced
In the owner field, click Change

Type your user name and press enter
Now check "Replace owner on sub-containers and objects" (below the owner field), and "Replace all child object permissions entries with inheritable permission entries from this object" (at the bottom), and click Add
Click "Select a principal"
Type your user name, press enter, and check "Full control"
Press OK and close all the permission settings. You will now be able to delete the key
Keep this procedure in mind, because we'll be doing that several times more.
Now reboot the system, enter regedit again and repeat this procedure for the following keys from HKEY_LOCAL_MACHINE\System\CurrentControlSet\Services\:
  • WdNisDrv
  • WdNisSvc
  • WdBoot
  • WdFilter
Reboot again and you have obliterated Windows Defender from your PC.

DISABLING TELEMETRY

Go to Start > Settings > Privacy > Feedback & Diagnostics and... surprise surprise! You can't turn off "Diagnostic and usage data" (aka telemetry).
Right-click Start and select "Command Prompt (Admin)", and type these commands:
sc delete DiagTrack
sc delete dmwappushservice
Now open File Explorer and type in the address bar: C:\ProgramData\Microsoft
You will find a folder called "Diagnosis". Just like the registry keys before, its permissions are deliberately messed up, and we have to fix them in order to delete it.
Right-click it and select the Security tab
Click Advanced, then click Change in the owner field.
Type your user name, press enter, check "Replace owner on subcontainers and objects" and "Replace all child object permission entries with inheritable permission entries from this object"
Click Add, then Select a principal, type your user name and press enter, and check Full control
Press OK and close all the windows to go back to the File Explorer. You can now enter the directory.
Select everything and delete it. If it complains that the files are in use, reboot and try again.
Right click Start and select "Comamnd Prompt (Admin)", and type the following commands:
sc stop DPS
sc stop WdiServiceHost
sc stop WdiSystemHost
sc stop WerSvc
If it says they're already stopped, don't worry. Now close the terminal, press Windows+R, type regedit and press enter.
Navigate to HKEY_LOCAL_MACHINE\System\CurrentControlSet\Services\ and delete the following keys with the usual method of fixing permissions:
  • DPS
  • WdiServiceHost
  • WdiSystemHost
  • WerSvc

DISABLING CORTANA AND WEB SEARCH

By default, when you type something in the search box, it will search it not only on your computer, but also online. We don't want that.
Click on the search box, and click the settings icon on the left
turn off everything.

DISABLING AND REMOVING ONEDRIVE

Press Windows+R, type gpedit.msc, and press enter.
Navigate to Computer Configuration > Administrative Templates > Windows Components > OneDrive. You will find a setting that says "Prevent the usage of OneDrive for file storage".
Double click it, select Enabled, press OK and reboot.
That's enough to disable it, but we also want to remove the icons all over the system.
Press Windows+R, type regedit and press enter.
Navigate to HKEY_CLASSES_ROOT\CLSID\{018D5C66-4533-4307-9B53-224DE2ED1FE6}
Strangely enough, this one doesn't have broken permissions, so you can just right click and delete it, and reboot the system.

DISABLING WIFI SENSOR AND DEFENDING YOUR NETWORK FROM IDIOTS WHO DIDN'T DISABLE IT

If your computer is logged into a Microsoft account, by default it will share your Wifi password with your Skype, Outlook and Facebook friends... which means your Wifi password will be sent to Microsoft.
Why on Earth you'd want your friends to freely access your Wifi, I have no idea, but at least you should disable it.
Go to Start > Settings > Network & Internet > Wi-Fi > Manage Wi-Fi settings and turn off everything.
That's enough to stop your PC from sending your Wifi password, but you can't expect everyone to have it turned off.
Kindly enough (or maybe they were scared of getting fined up the ass by the EU again), if you add _optout at the end of your Wifi network's SSID, Wifi sensor won't send your password.
You can change your SSID from your router's settings.

LAST LINE OF DEFENCE: USE A FIREWALL!

You can use firewall software, such as TinyWall to block all traffic except the one you explicitly allow.
Setting up the firewall may take some time, but you'll be as safe as you could possibly be when using Windows.

DON'T USE MICROSOFT APPS

Apps like the photo viewer, media player, etc. send data to Microsoft. If you're behind a properly configured firewall, it will be blocked, otherwise, consider using some replacements, such as VLC, Sumatra PDF, JpegView, and so on. There's plenty of excellent free and open-source software online.

NOT RECOMMENDED: DISABLE WINDOWS UPDATE

Using a firewall, it is possible to block the Windows Update Service. This is something I don't recommend because Windows 10 will (probably) be the last version of Windows and will only receive updates through Windows Update. Not to mention, your PC would be exposed without security fixes.

CONGRATULATIONS! YOUR COPY OF WINDOWS IS NOW DEBOTNETTED!

Things will change in the future, and I'll do what I can to keep this guide updated.
As of November 2015, this guide works on Windows 10 Pro.


Saturday, June 13, 2020

The Best Cybersecurity Tips for Working Remotely


The Best Cybersecurity Tips for Working Remotely


It is important to implement a few best practices that will keep Cybercriminals and your computers, devices, and data safe.


Cybercriminals are taking advantage of more people working from home. Are you looking for ways to keep your computer and information safe and secure while working remotely? Do you own a business and want to help your employees maintain cybersecurity measures while working from home? Either way, you can find helpful advice in the following tips from SMU Chief Security Officer George Finney.

Cybersecurity tips for remote workers

  • If you use Wi-Fi at home, confirm your network is set up with the proper security. Ensure your password is hard to guess, and use “WPA2” or “WPA3” security.
  • If you’re using your own computer or mobile device (a device not issued by your employer) for remote work, make sure you’ve enabled basic security features. Enabling the password, PIN, fingerprint or facial ID feature will prevent people from accessing your device.
  • Take the time to update your computer software. Better yet, enable the option on your device to check for updates and have them installed automatically. Working with outdated software is very risky, as it is a major target for cybercriminals.
  • Make sure your computer has an up-to-date antivirus solution installed.
  • If possible, don’t store work documents that contain sensitive information on your personal computer. If this isn’t possible, ensure the files are encrypted and password-protected.
  • Avoid giving personal information online unless you are very familiar with the website. Hackers may try to get your information by creating fake charities and asking for COVID-19 related donations.
  • If you’re seeing unusual or suspicious activity on any device you’re using while working remotely, reach out to your employer to investigate the situation.

Look out for phishing emails and websites

Beware of phishing emails and websites, especially ones pertaining to the coronavirus pandemic and related topics, such as health information, by following the suggestions below:
  • Closely scan emails and don’t open attachments unless they’re from a source you know and trust. If you receive an email with an attachment from someone you don’t know, or an email from someone you do know but with an attachment you weren’t expecting, it may be a phishing attempt.
  • Pay close attention to the actual email address of senders — fake emails are going around from individuals disguising themselves as high-ranking employees.
  • Inspect a link by hovering your mouse over the URL to see where it leads. Keep in mind that phishers can create links that closely resemble legitimate addresses, so you’ll need to do this with a keen eye.
  • Beware of online requests for personal information such as your Social Security number or login information. Legitimate government agencies and organizations won’t ask for that information.
  • Be leery of generic greetings in emails. Phishing emails are unlikely to use your name; instead, you may see greetings such as “Dear sir or madam.” This is a good sign that the email isn’t legitimate.
  • Phishing emails often try to create a sense of urgency and demand immediate action. Don’t click any links in these emails or respond to them. Just delete them.

Cybersecurity tips for participating in virtual meetings and events

Whenever taking part in a virtual event, you’ll want to secure your physical space, the video/audio interaction and the connection.
  • Physical space: Take a look at the background that will be appearing behind you. Ensure there isn’t any private information the webcam can pick up, including books and other items that appear on shelves. Avoid displaying anything that may contain personal or personally identifiable information, such as personal photos or a white board with private company information.
  • Video/audio interaction: When you don’t need to interact during a virtual meeting, it’s best to keep your camera off and your microphone muted. When not using meeting software, close the application.
  • The connection: If you are hosting a virtual meeting with colleagues or employees, don’t post your meeting links anywhere someone outside of your company can find them, including social media. Only keep your meeting room links between you and your colleagues and employees.
Don’t give cybercriminals a chance to trick you and compromise your confidential data. Follow the above tips and pass them along to your employees to create a safe home office environment that’s protected against hackers.
Resources:

Monday, September 10, 2018

Windows 10 - Stop Computer From Turning Off, Sleeping, Hibernating After Many or Few Minutes

Windows 10 - Stop Computer From 

Turning Off, Sleeping, Hibernating After Many or Few Minutes


By Marco Ayllon
Nautilus Science and Technology News

Does your Windows 10 PC turn of after 30, 20, 15, 10 or 5 minutes ... or whatever? Does it drive you crazy? Adjust power options, power settings, etc. Access advanced power settings. Stop hard drive from turning off This video shows you how to disable sleep, hibernation, etc. and keep your computer from turning off! Adjust power button settings. Stop automatic shutdown.


MAAB and NSTN 2018

How to Speed Up Windows 10

How to Speed Up Windows 10 

10 Easy Procedures:


You can make your PC faster without installing an SSD.                                                                            

by Marco Ayllon
Nautilus Science and Technology News

Windows 10 was released to retail on July 29, 2015, since then we have been using Windows10 for more than 3 years. After continually using this operating system we are annoyed about waiting too long when we turn on to load our O.S. and computers, and we noticed this Windows 10 has begun to lose some of its lusters, there are ways to put a little pep back in its step. Here are some quick, easy ways to improve its performance in the booting process without swapping out any hardware. 

1. Go opaque

Windows 10's new Start menu is sexy and see-through, but that transparency will cost you some (slight) resources. To reclaim those resources, you can disable transparency in the Start menu, taskbar, and action center: Open the Settings menu and go to Personalization > Colors and toggle off Make Start, taskbar, and action center transparent.


Making the Start menu, taskbar, and action center transparent is one thing, but Windows 10 still has a lot of other snazzy, built-in special effects. To really go bare-bones on the special effects, right-click the Start button and click System.


Click Advanced system settings to open the System Properties menu. On the Advanced tab under Performance, click Settings...


This will open the Performance Options menu. In the Visual Effects tab, either choose to Adjust for best performance to turn off all unnecessary animations and special effects, or choose Custom: and deselect the visual effects you think can live without. When you're finished, click OK to apply your changes.

3. Disable Startup programs

If your PC is taking a long time to boot up -- and you've enabled Fast Startup and everything -- you may have too many programs starting up when you turn your computer on. To fix this, right-click on the Start button and click Task Manager. Click the Startup tab (click More details if you don't see the Startup tab) and peruse the list of programs that start up with your computer. If you see a program that doesn't need to be there, right-click it and click Disable. You can also arrange the list of programs by Startup impact if you'd like to see the programs that are taking up the most resources (and time).


4. Find (and fix) the problem

Windows 10 has a built-in performance troubleshooter that can help you find and fix any problems that might be affecting your PC's speed. To open the troubleshooter, right-click on the Start button and click Control Panel. Under Security and Maintenance at the top, click Troubleshoot common computer problems. Next, under System and Security, click Run maintenance tasks.


run-maintenance-tasks.png


5. Reduce the Boot Menu Time-out

When your computer starts up, the boot menu is displayed for a certain amount of time before the operating system loads. This gives you time to do things like start Windows in Safe Mode. You can shave a few seconds off your startup time by changing the boot menu time-out, which is set to 30 seconds by default.


To do this, right-click on the Start button and click Control Panel. Go to System > Advanced system settings, and, under Startup and Recovery, click Settings.


Next to Time to display a list of operating systems:, change the value from 30 seconds to 10 seconds and click OK.

6. Turn Off Windows Suggestions:

In an effort to be helpful, Windows 10 will sometimes give you tips on how to get the most out of the OS. It scans your computer in order to do this, a process that can have a slight impact on performance. To turn off these tips, go to Start > Settings > System > Notifications & actions and toggle off Get tips, tricks and suggestions as you use Windows.


no-tips.jpg

7. Run Disk Cleanup

This one's a win-win. It'll improve performance and free up space on your hard drive. Disk Cleanup has been around forever, but this trusted Windows utility can still help clean out the temporary files, installers and other junk littering your hard drive. To run it, just search for Disk Cleanup, run it and click the button labeled Clean up system files


disk-cleanup.jpg

8. Eradicate Bloatware

If your PC came with preinstalled apps you don't want or need, get rid of them. Same goes for any apps you installed that you later found to be of little or no use. Right-click the Start menu, choose Control Panel and under the Programs header, click Uninstall a program. Peruse the list from time to time and select the programs you no longer need and click Uninstall at the top of the list.


uninstall-apps.jpg

9. Power plan

Make sure you aren't using a Power saver plan if you don't need to. Even desktops will sometimes feature a power-saver option, which doesn't do you any good unless you are trying to conserve battery life. Open the Control Panel and go to Hardware and Sound > Power Options to see which power plan you are currently using. For better performance, make sure you are using a High Performance or Balanced plan (or a plan from the PC manufacturer that says it's balanced).


power-plan.jpg

10. Restart your PC

Is speeding up your computer as simple as...restarting it? Maybe. Restarting your PC clears out its memory and stops any processes that might be taking up resources. Also, shutting down your computer is not the same as restarting it -- shutdown is affected by Windows 10's Fast Startup, which saves a snapshot of your PC and its processes in a hiper-file for faster boot-up. Restart is not affected by Fast Startup, so if you have Fast Startup enabled, restarting your PC is the only way to fully clear the memory and shutdown processes.
MAAB / NSTN 2018